
SpringBoot 프로젝트 시작하기 11 - 프로파일 만들기
프로파일 뷰
프로파일에 들어갈 요소로 이름, 자세히, 회사, 주소 이렇게 4개만 사용하겠습니다. 우선 프로파일 뷰 파일을 간단하게 작성하고 바로 백엔드 구성으로 들어가겠습니다.
<template>
  <v-layout align-start justify-center row wrap>
    <v-flex xs12 sm6 md4>
      <v-card class="pa-3 ma-1">
        <div class="headline">
          <v-layout align-center justify-start></v-layout>
          <v-divider></v-divider>
        </div>
        <v-form class="pa-3" ref="form">
          <v-text-field label="Email" v-model="email" :disabled="true"></v-text-field>
          <v-text-field label="Name" v-model="profile.name"></v-text-field>
          <v-text-field label="Bio" v-model="profile.bio"></v-text-field>
          <v-text-field label="Company" v-model="profile.company"></v-text-field>
          <v-text-field label="Address" v-model="profile.address"></v-text-field>
          <v-btn color="primary" >Edit</v-btn>
        </v-form>
      </v-card>
    </v-flex>
  </v-layout>
</template>
<script>
export default {
  mounted () {
  },
  methods: {
  }
}
</script>
EER 다이어그램
추가한 화면을 보면 각 아이디마다 어떤 값을 넣어야 할지 알 수 있습니다. 그렇다면 서버에서는 어떻게 구현해야 할까요? accounts 테이블에 컬럼을 추가할 것인지, 새로 테이블을 만들 것인지, 테이블을 만든다면 어떤 관계를 짤 것인지, 저의 경우에는 새로 Profile 테이블을 만들었으며 개개인에게는 한명당 하나의 프로파일만 있으면 된다고 생각하여 accounts 테이블과 일대일 관계를 만들었습니다.
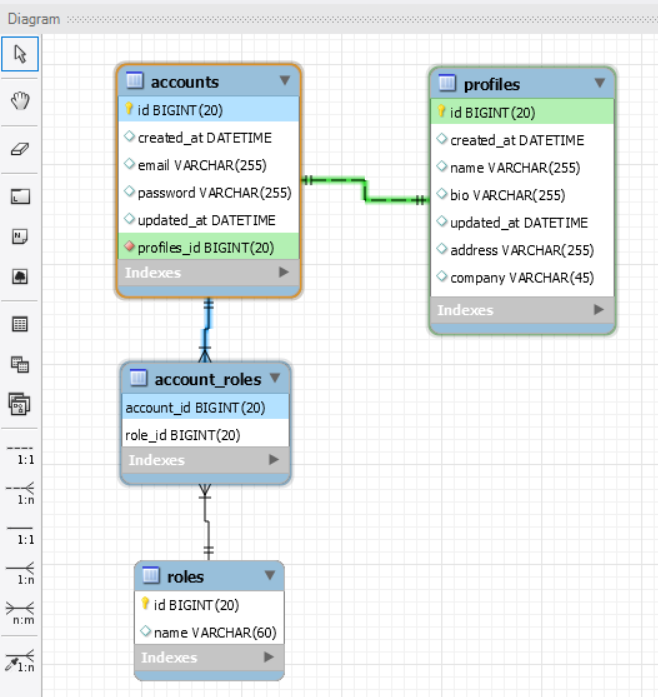
MySQL 워크벤치에서 EER 다이어그램 기능을 지원하니 도움이 될 것 같습니다. 우리는 이제 위와 같은 관계 다이어그램을 참고 하여 Account 클래스를 작성했던 것처럼 Profile Entity 클래스를 만들 것입니다. 제가 참고했던 1대1 예제가 있으니 한번 참고하길 바랍니다.
프로파일 Entity
@Entity
@Getter
@Setter
@NoArgsConstructor
@Table(name = "profiles")
public class Profile {

    @Id
    @GeneratedValue(strategy = GenerationType.IDENTITY)
    private Long id;

    private String name;

    private String bio;

    private String company;

    private String address;

    @JsonBackReference
    @OneToOne(fetch = FetchType.LAZY, optional = false)
    @JoinColumn(name = "account_id", nullable = false)
    private Account account;

    @CreationTimestamp
    private LocalDateTime createdAt;

    @UpdateTimestamp
    private LocalDateTime updatedAt;

    public Profile(String name, String bio, String company, String address) {
        this.name = name;
        this.bio = bio;
        this.company = company;
        this.address = address;
    }
}
Account 클래스를 기본으로 Profile 클래스를 작성하였습니다. 1대1 관계를 명시하기 위해 @OneToOne를 선언하였습니다. 이것 또한 Account 클래스에서도 선언하여합니다.
    @JsonManagedReference
    @OneToOne(fetch = FetchType.LAZY, cascade = CascadeType.ALL, mappedBy = "account")
    private Profile profile;
@JsonBackReference와 @JsonManagedReference에 대해 의문이 들텐데 설명하자면 JPA는 ORM이기 때문에 RDB를 관리하는데 있어서 양방향 참조를 필요로 합니다. 그렇기에 무한 순환 참조 현상이 일어나는데 자세한 내용은 링크를 남겨놓겠습니다.
이러한 문제를 해결 하기 위해 사용하는 것이 위 두 어노테이션입니다. 이 둘을 선언함으로서 무한 순환 참조 현상을 막을 수 있습니다. Role 클래스도 관계를 명시했지만 JoinTable을 이용한 다대다 관계 선언이기 때문에 JoinTable을 접근 후 다른 테이블을 호출하여 무한 순환 참조 현상이 일어나지 않습니다.
프로파일 기능 정의
이제 추가해야할 기능에 대해서 정의해 봅시다. 첫째, 프로파일을 수정할 수 있어야 한다. 둘째, 프로파일 화면을 불러올 시 로그인 아이디에 해당하는 프로파일 정보를 불러와야 한다. 이 두 기능을 만들기 위해 해야할 일에 대해 적어본다면
첫째, 접근하기 위한 서버 API 주소와 컨트롤러 정의하기. 둘째, 요청에 대한 정보를 받기위한 페이로드 작성. 셋째, 프로파일 레포지토리 작성. 넷째, 두 기능을 정의하는 서비스 작성. 이상입니다. 해야할일이 정해졌으니 차례차례 해봅시다.
첫째, 접근하기 위한 서버 API 주소와 컨트롤러 정의하기.
@CrossOrigin
@RestController
@RequestMapping("/api/account")
public class AccountController {

    @Autowired
    private AccountService accountService;

    @GetMapping("/profile")
    public Profile loadProfile(@RequestParam(value = "email") String email) {
        Profile profile = accountService.loadProfile(email);

        return profile;
    }

    @PostMapping("/profile/edit")
    @PreAuthorize("hasRole('USER')")
    public ResponseEntity<?> editProfile(@RequestBody ProfilePayload profilePayload) {

        Account account = accountService.editProfile(profilePayload);

        URI location = ServletUriComponentsBuilder.fromCurrentRequest().path("/{accountId}")
                .buildAndExpand(account.getId()).toUri();

        return ResponseEntity.created(location).body(new ApiResponse(true, "Profile edited Successfully"));
    }

}
}
둘째, 요청에 대한 정보를 받기위한 페이로드 작성.
@Getter
@Setter
@Builder
@AllArgsConstructor
@NoArgsConstructor(access = AccessLevel.PROTECTED)
public class ProfilePayload {

    private String email;

    private String name;

    private String bio;

    private String company;

    private String address;

}
셋째, 프로파일 레포지토리 작성.
public interface ProfileRepository extends JpaRepository<Profile,Long>{
    Optional<Profile> findByAccountId(Long accountId);
    Boolean existsByAccountId(Long accountId);
}
넷째, 두 기능을 정의하는 서비스 작성.
@Service
public class AccountService implements UserDetailsService {

        @Autowired
        private ProfileRepository profileRepository;


        public Account editProfile(ProfilePayload profilePayload) {
                Account account = accountRepository.findByEmail(profilePayload.getEmail())
                                .orElseThrow(() -> new UsernameNotFoundException(
                                                "Account not found with email : " + profilePayload.getEmail()));
                Profile profile = new Profile();
                if(profileRepository.existsByAccountId(account.getId())) {
                profile = profileRepository.findByAccountId(account.getId())
                                        .orElseThrow(() -> new UsernameNotFoundException(
                                                        "Profile not found with id : " + account.getId()));
                }

                profile.setName(profilePayload.getName());
                profile.setBio(profilePayload.getBio());
                profile.setCompany(profilePayload.getCompany());
                profile.setAddress(profilePayload.getAddress());

                account.setProfile(profile);
                profile.setAccount(account);

                return accountRepository.save(account);
        }

        public Profile loadProfile(String email) {
                Account account = accountRepository.findByEmail(email).orElseThrow(
                                () -> new UsernameNotFoundException("Account not found with email : " + email));
                Profile profile = account.getProfile();

                return profile;
        }

}
프로파일을 수정하는 editProfile 메소드와 기존에 작성했던 프로파일 불러오는 loadProfile 메소드를 작성하였습니다. 서버 쪽 작업은 이것으로 마무리 되었습니다. 이제 필요로 하는 요청을 만들기 위해 다시 뷰 앱으로 넘어갑시다.
프로파일 요청과 응답
저번 포스트에서 로그인 기능과 사인업 기능을 만드는 방법에 대해서 기억하고 있다면 그 기능의 코드를 활용하여 우리가 필요로 하는 기능을 만들 수가 있습니다. 우선 필요한 변수부터 선언합시다.
<script>
export default {
  data: () => ({
    profileText: 'Profile',
    email: localStorage.email,
    profile: {
      name: null,
      bio: null,
      company: null,
      address: null
    }
  })
}
</script>
그 다음 우리는 아직 프로파일에 아무런 데이터가 들어가 있지 않기 때문에 데이터를 채워넣는 기능부터 만들도록 할 것입니다. APIUtils의 editProfile 메소드는 지난 포스트를 참고하면 쉽게 만들 수 있기 때문에 생략하겠습니다.
<script>
import { editProfile } from './APIUtils'
export default {
  methods: {
    onEditProfile () {
      const signupRequest = {
        email: this.email,
        name: this.profile.name,
        bio: this.profile.bio,
        company: this.profile.company,
        address: this.profile.address
      }
      editProfile(signupRequest)
        .then(() => {
        })
        .catch(() => {
        })
    }
}
</script>
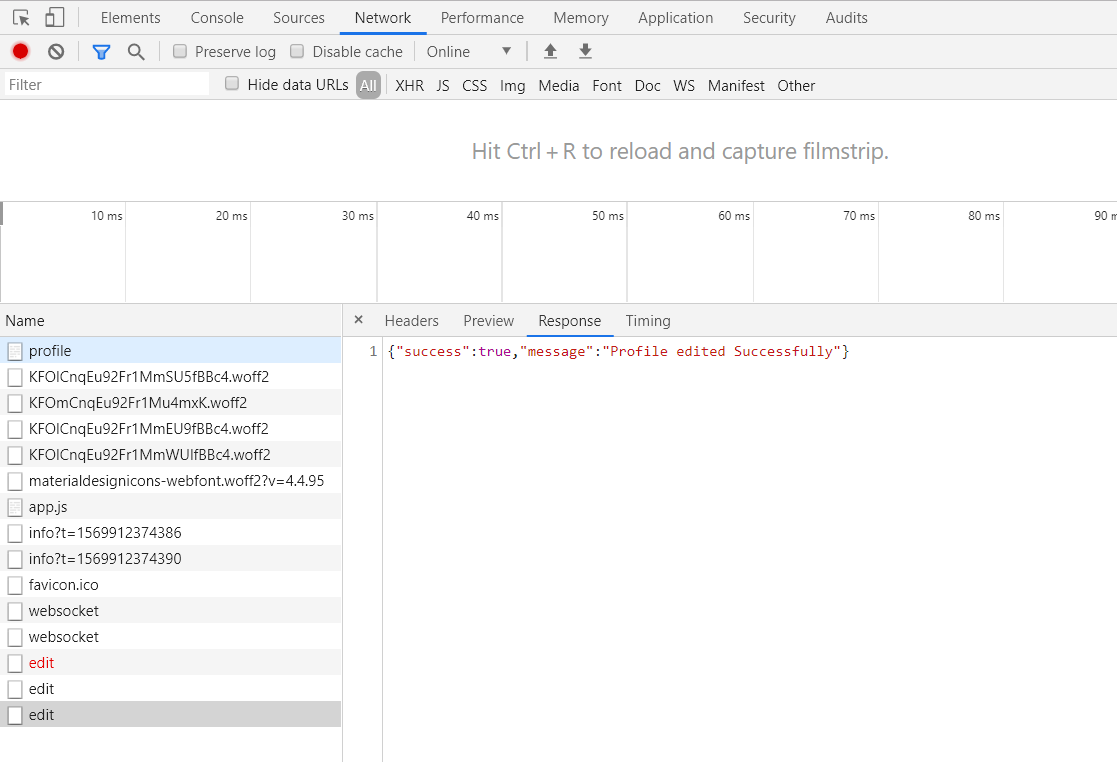
기능을 만들고 @click 리스너에 메소드명을 넣어 프로파일에 넣고 싶은 내용을 채워넣고 Edit 버튼을 눌러 테스트해보면 아래의 그림처럼 메세지가 뜰 것입니다.
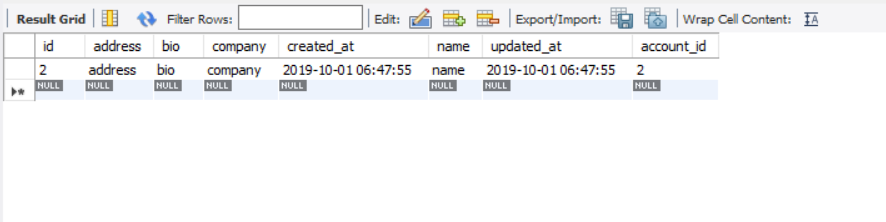
아직 프로파일을 불러오는 기능을 만들지 않았기 때문에 http://localhost:8082/profile로 다시 접근했을 때는 적었던 내용들이 나타나지 않을 것입니다. 이제 불러오기 기능을 만들어봅시다.
<script>
import { editProfile, loadProfile } from './APIUtils'
export default {
 mounted () {
    this.onLoadProfile()
  },
  methods: {
    onLoadProfile () {
      loadProfile(this.email)
        .then(response => {
          this.profile = response
        })
        .catch((error) => {
          // eslint-disable-next-line
          console.log(error)
          // this.errorAlarm()
        })
    }
  }
}
</script>
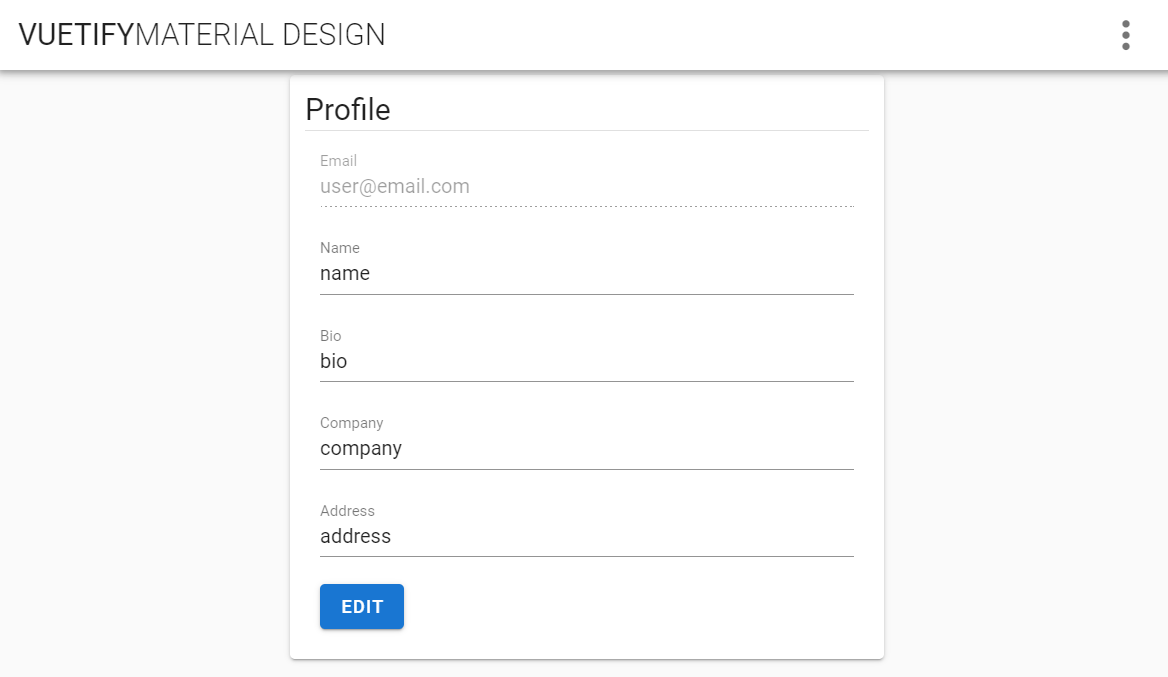
불러오기가 잘 됬다면 본인이 입력했던 내용을 확인 할 수 있을 것입니다.