
SpringBoot 프로젝트 시작하기 8 - 로그인 구현하기
포트 변경
여태까지 제가 알려준 방법으로 서버를 실행하는 건 좀 불편합니다. 프론트 서버부터 실행하고 백엔드 서버를 실행하려하면 실행되지 않았습니다. 이러한 경우 서버 포트번호를 변경해야 합니다. application.yml에 들어가 아래 항목만 변경하면 됩니다.
server:
    port: 8081
위 매개변수를 사용하는 임베디드 톰캣이 바뀐 포트 번호로 실행되게 됩니다. 임베디드 톰캣는 스프링 부트에서 사용하는 내장 WAS입니다.
다만 임베디드 톰켓보다 빠른 Undertow가 있어서 그걸 사용할려고 합니다.
Undertow
OKKY에서 zepinos님이 쓴 이 칼럼에서는 Undertow가 Tomcat보다 좀 더 최신 방식이며 Spring Boot 공식 지원이니 사용하자는 것입니다. 약간의 수고로 테스팅 시간을 줄일 수 있으니 변경하는게 좋다고 생각합니다. 그 방법은 아래에 있습니다.
configurations {
    compile.exclude module: 'spring-boot-starter-tomcat'
}
dependencies {
	compile 'org.springframework.boot:spring-boot-starter-undertow'

	// providedRuntime 'org.springframework.boot:spring-boot-starter-tomcat'
    providedRuntime 'org.springframework.boot:spring-boot-starter-undertow'
}
첫째로 내장되 있는 Tomcat을 배재하는것이고 둘째로 Undertow 의존성을 추가하는 것입니다. Gradle configuration update를 하고 앱을 실행하면 Undertow started on port(s) 8081 (http) with context path라는 로그가 반겨줄 것입니다.
Login Signup RestController
@CrossOrigin
@RestController
@RequestMapping("/api/auth")
public class AuthController {

    @Autowired
    AuthenticationManager authenticationManager;

    @Autowired
    AccountRepository accountRepository;

    @Autowired
    RoleRepository roleRepository;

    @Autowired
    PasswordEncoder passwordEncoder;

    @Autowired
    JwtTokenProvider tokenProvider;

    @PostMapping("/login")
    public ResponseEntity<?> authenticateUser(@Valid @RequestBody SignRequest signRequest) {
        Authentication authentication = authenticationManager.authenticate(
                new UsernamePasswordAuthenticationToken(signRequest.getEmail(), signRequest.getPassword()));

        SecurityContextHolder.getContext().setAuthentication(authentication);

        String jwt = tokenProvider.generateToken(authentication);
        return ResponseEntity.ok(new JwtAuthenticationResponse(jwt));
    }

    @PostMapping("/signup")
    public ResponseEntity<?> registerUser(@Valid @RequestBody SignRequest signRequest) {
        if (accountRepository.existsByEmail(signRequest.getEmail())) {
            return new ResponseEntity(new ApiResponse(false, "Username is already taken!"), HttpStatus.BAD_REQUEST);
        }
        // Creating user's account
        Account account = new Account(signRequest.getEmail(), signRequest.getPassword());

        account.setPassword(passwordEncoder.encode(account.getPassword()));

        Role userRole = roleRepository.findByName(RoleName.ROLE_USER)
                .orElseThrow(() -> new AppException("Account Role not set."));

        account.setRoles(Collections.singleton(userRole));

        Account result = accountRepository.save(account);


        URI location = ServletUriComponentsBuilder.fromCurrentContextPath().path("/api/accounts/{email}")
                .buildAndExpand(result.getEmail()).toUri();
        return ResponseEntity.created(location).body(new ApiResponse(true, "Account registered successfully"));
    }
}
저번 Vue App 포스트에서 하지 못했던 것을 마저 이어 하겠습니다. Signup은 JPA 작업만 거치면 되지만 Login은 다릅니다. SpringSecurity가 기본적으로 제공해 주던 기능을 JWT를 사용 할 수 있도록 변경해 줘야 하기 때문입니다.
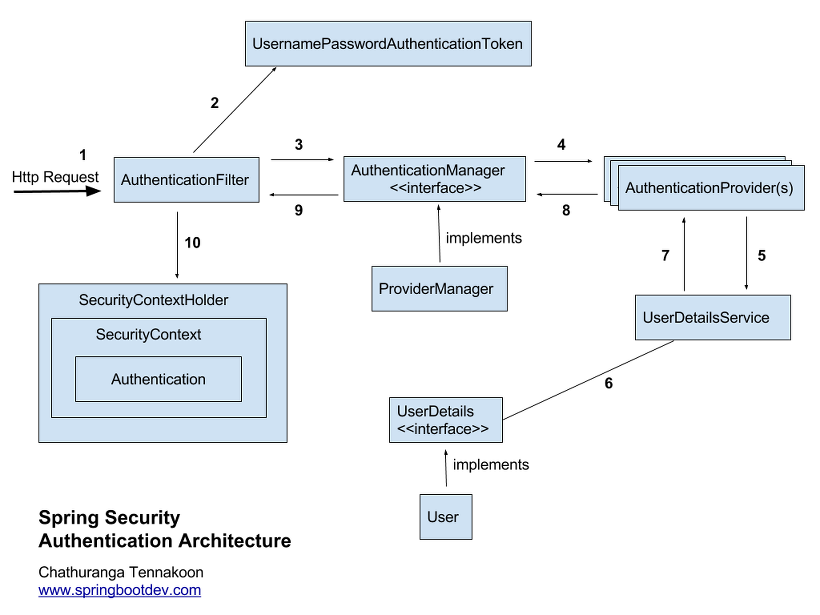
위 아키텍쳐를 보고 다시 코드를 보면 좀 더 명확하게 보일 것입니다. 기본 인증 과정을 거치고 토큰을 발급하여 후에 접근 시 필터에서 토큰의 유효성을 검사하는 것으로 인증여부를 결정하는 것입니다.
로그인 사인업 기능 구현
이전과 다르게 SpringSecurity가 적용된 서버에 맞춰야 하기 때문에 Vue App도 바껴야 합니다. Login하거나 Signup 하는 등 앞으로 여러 주소와 통신해야 하는데 기존의 방법으로는 코드가 복잡해 집니다. 필자는 Callicoder 블로그에서 사용한 방법이 좋기에 그 방법을 사용할 것입니다.
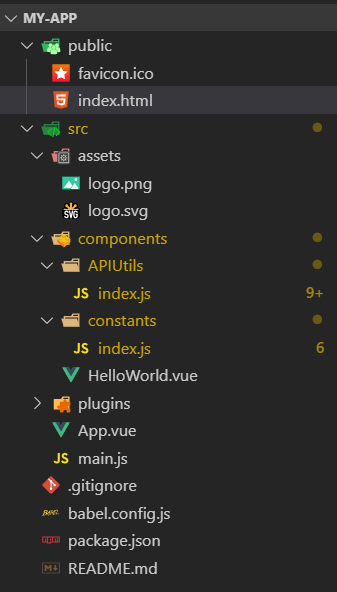
APIUtils는 Fetch 부분을 간략하게 만들기 위해 사용되었으며 아래와 같습니다. constants에서 서버 URL변수를 선언하여 프로퍼티처럼 사용합니다.
import { API_BASE_URL } from '../constants'

const request = options => {
  const headers = new Headers({
    'Content-Type': 'application/json'
  })

  if (localStorage.accessToken !== 'null') {
    headers.append('Authorization', 'Bearer ' + localStorage.accessToken)
  }

  const defaults = {
    headers: headers
  }
  options = Object.assign({}, defaults, options)
  return fetch(options.url, options).then(response =>
    response.json().then(json => {
      if (!response.ok) {
        return Promise.reject(json)
      }
      return json
    })
  )
}

export function login (loginRequest) {
  return request({
    url: API_BASE_URL + '/auth/login',
    method: 'POST',
    body: JSON.stringify(loginRequest)
  })
}

export function signup (signupRequest) {
  return request({
    url: API_BASE_URL + '/auth/signup',
    method: 'POST',
    body: JSON.stringify(signupRequest)
  })
}
export const API_BASE_URL = 'http://localhost:8081/api'
export const ACCESS_TOKEN = 'accessToken'
보다 시피 공통적으로 사용하는 URL, Header를 추가하는 부분과 Response을 json화 하여 출력하는 부분을 가지고 있습니다. Header에서는 요청에서 보내는 내용의 형태를 json으로 정의하고 login 후에 받게될 JWT를 헤더에 붙여 사용하고 있습니다. 서버는 요청을 받으면 헤더에서 JWT 찾아 검증 및 인증 작업을 할 것입니다. Login 화면은 그대로 하되 script 부분만 아래처럼 고치면 됩니다.
<script>
import { login } from './APIUtils'

export default {
  data: () => ({
    password: '',
    passwordRules: [
      v => !!v || 'password is required',
      v => v.length >= 8 || 'password must be at least 8 characters',
    ],
    email: '',
    emailRules: [
      v => !!v || 'E-mail is required',
      v => /.+@.+/.test(v) || 'E-mail must be valid',
    ],
  }),
  methods: {
    onLogin () {
      this.isLoading = true
      localStorage.email = this.email
      let loginRequest = {
        email: this.email,
        password: this.password
      }
      login(loginRequest)
        .then(response => {
          localStorage.accessToken = response.accessToken
        })
    }
  }
}
</script>
APIUtils에서 login 메소드를 가져와 사용합니다. 서버의 응답에서 accessToken을 찾아 로컬에 저장합니다. 나중에 요청할 때마다 헤더에 넣어 인증수단으로 사용하기 위해서입니다.
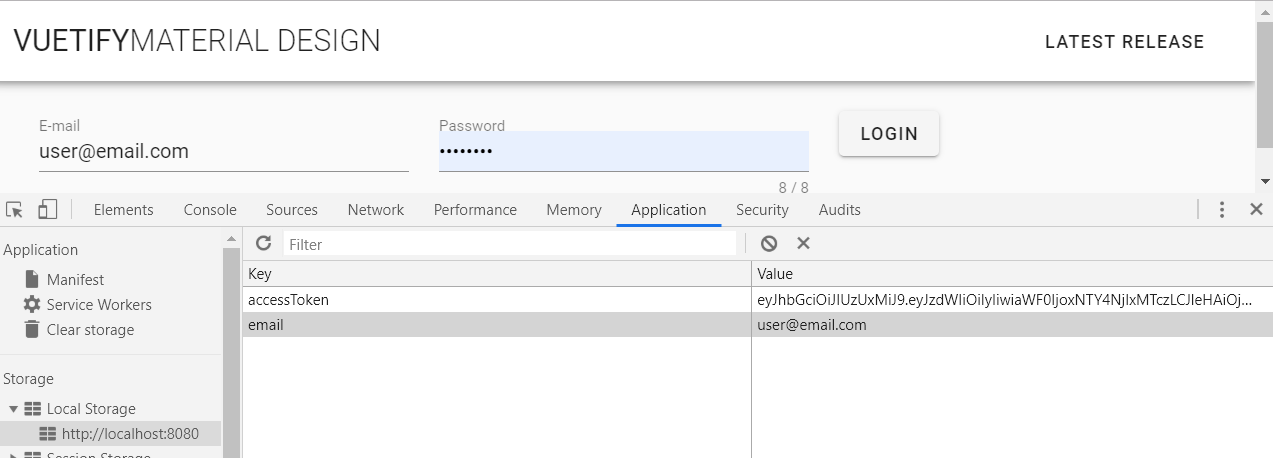
MySQL포스트에서 포스트맨을 통해 이미 아이디를 만들었기 때문에 Signup 없이 진행할 수 있습니다. 아이디와 비밀번호를 입력하고 로그인을 하면 위와 같이 로컬스토로지에 JWT가 저장된 것을 확인 할 수 있습니다. 나중에 다른 API를 만들어 보고 JWT 유무에 따라 접근이 되는지 아닌지 확인해 볼 것입니다. Signup 기능은 다음 포스트에서 Vue-Router를 다루면서 같이 설명할 것입니다.